Quilted question 6/27/06
 I've been working on two bags. They are made from double sided prequilted fabric. On one of these, to sew the sides together I simply zig zaged the edges first and then stitched them together, first with a straight stitch and then with a another round of zig zags for strengthening. If you've ever worked with quilted fabric then you know when I turned the bag inside out where these were sewn together there is some fraying along the seams.
On the second one I wanted to add a pocket, so I cut out a smaller section to become a separator in between the side panels and stitched some pockets on it. To avoid the fraying I stitched on binding on the separator sides as well as the side panels while it was inside out. The problem is when I turn it right side out, the corners poke up, down on the inside. They don't push all the way out. I know that when we go around corners we need to make snips but I couldn't do this with the hem binding. I thought about cutting off the corner that is poking and sewing where I cut, but this would remove the binding and might be odd. I'm considering ripping the binding off, but then I don't have any better resolution. My only other thought would be to just remove the binding like in the first one and leaving the funny edges. It would be a whole lot of work to undo what I've done now! Any ideas ladies?
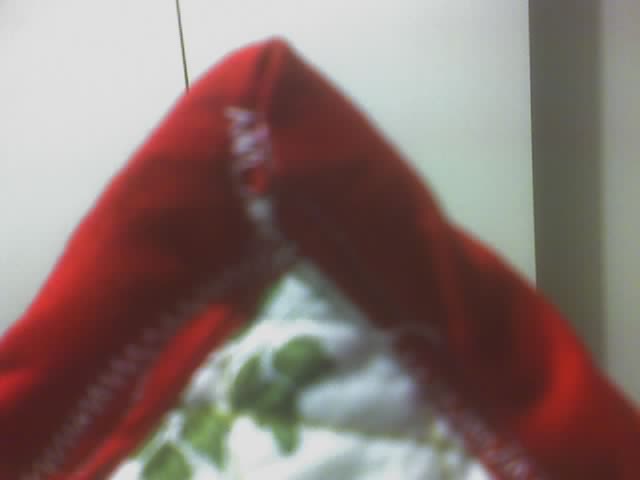
In this picture you can see how wrong it is, this is what needs to turn inside out to become the deep pocket corner.
posted by Gina at 2:45 PM
![]()
17 Comments:
What if you just cut off the corner and sewed along that edge so it didn't fray? OR alternatively rather than sewing use a fray stop type glue?
I'm constantly hacking corners off of things but then again I'm a pretty rough seamstress.
Do you ever sleep?!? :)
Merci beaucoup lady k, can't get over the fact that you're in Paris! If I do cut the corner off the batting will be exposed, so I want to be sure that's the best option. I was looking at it today and thinking about perhaps just ripping the bottom part of the binding? I'd need to go over it again and again for stability, and see, the bottom part is the part we would want the most strength on, I'm confusing myself!
I've seen your stuff, you surely can sew, you are one of those multi media types!
Sleep, yes I just do it backward, I'm late to bed and late to rise!
I know my answer isn't going to be very helpful. I line my quilted bags so that you can't see the batting and I don't have to use binding. Good luck with whatever approach you take! I would love to see the finished bag.
maybe you could do french seams on your next bag. this technique will cover raw edges completely.
do you cut extra side- and bottom pieces or do you just sew two squares together and then bring down the sideseam to meet the bottom seam and shape your bag by doing a cross-seam respectively a triangle?
hard to explain, as i´m not a native... but supereggplant has a wonderful tutorial for this technique.
this combined with the french seams should solve your problem for the BAG, but unfortunately not for your separator... maybe you could include it in the sideseams or sew the pockets directly to the backside of your bag?
Hi cathy, yes I usually put a lining in too, but since this fabric is double sided and both sides are very pretty, I wanted both sides of the fabric to be visible, one side on the outside and one side on the inside. This really wouldn't have been a problem except for all that batting and thread jazz getting exposed.... any hoo, I'm still working on it but after it is given (it's a gift), I'll put pics up for you. And thank you!
Hi madhatter, french seam is a great idea! I just did a tester with a swatch of the quilted fabric, works well. So I think I am going to seam rip out the hemming on this one and try sealing it up again. On this bag I have one bit fabric that I fold in half sideways (so the right side needs sewn up and the bottom needs sewn up). The center pocket is a square by itself that (same size dimensions as the rest of the bag except not as tall). So if I did this (french seam) there would be a tube like effect on the outside edges of the bag though right?
Madhatter - what if I did the french seam the opposite way, so that the tube (the fat part of the seam) was on the inside rather than the outside, would that work?
Another note, since I only have the one side and the bottom (the other side is a fold - no seam), it might look funny? Not to have the seam on one side. So perhaps I should just french seam the bottom only....
Hi Gina.
Did you figure it out?
I hope so.
I still haven't finished my patchwork/quilting since I was 17 yrs old...
Hi Kumi, not yet. I did tear out the bottom hem today but before I try the french seam on the bottom that madhatter so kindly recommended I want to decide if I want to tear the side out or not. I'm looking at it a lot, and thinking! Perhaps you would go back to your earlier work now?
that would look funny, you´re right.
i´d prefer having three seams: two at the side and one at the bottom.
first seam is made with right sides together, seam allowances point towards the later "inside" of bag.
then you turn (left sides facing), stitch again, enclosing all raw edges.
when you turn the bag, the "tube" should be on the inside of the bag. if you want, you can press it flat and stitch-in-the-ditch from the right side, so your seam-allowance lies flat and is fixed.
if you really want to have less seams, take your rectangle and fold it in a way that you have to close two side seams instead of a bottom and a side seams (meaning that the "fold" IS the bottom). that way it won´t look funny, too.
and of course the seam allowances should be inside the bag *g*
did it help?
Hi madhatter, yes this is what I was wondering, if I could do the French seam in reverse order (right sides together first) so that the tube is inside, so I'm really glad you said that! If I didn't have that middle separator I would have had the fold at the bottom, I left the fold at the side since I would have to sew the separator bottom anyways, but I agree the symmetry of two side seams is much better looking than the two seams being one side and the bottom. There is no problem with frech seams running into each other is there? When the side would run into say the bottom?
And yes, yes madhatter, I'm so glad you are here and you have been so very helpful! Thank you so much for taking the time to help me!
Oh I think I could like to sew if it were with you!
Wish you were tongue in cheek!
you´re welcome, gina ^^
hmm... when side seam would run into bottom seam... never had it, as mostly i use this seam on dresses, so there´s no "crossing". i´ll have to check that.
i think there won´t be a big prolbem when you sew with normal fabric, but with prequilted fabric the "meeting points" of side seam / bottom seam could be a bit bulky... you may have to cut back seam allowances at that points. but - as said, i would have to check that out.
if you want to have a bottom seam instead of a fold (from that rectangle i mentioned earlier) you may use french seams at the sides and a "normal" seam (double sewn) at the bottom. you can cover the raw edges of your bottom seam with bias, that would make a "clean" look for your bag interior.
i´d cover each allowance seperately. and i´d do this BEFORE any bag seam is sewn - it´s easier and the raw edges of bias will disappear in the sideseams, if you sew the bottom seam first.
think that might work without problems.
ehm.... does anyone know what i´m talking about?
That really is an interesting alternative cherry rolfe, so glad to have you here! Thanks!
Thanks madhatter!
So on my pocket (and middle separator) I had that same red hemming up the sides, and the left side was already sewn to the fold (also on the left side of the bag). The hem on the right side ended up making a lot of these problems (down on that corner where it meets the right side). As well as the fact that I needed to sew the pocket separator to the bottom, which meant a. I had to sew a bottom and b. doing this would run into a appliqué that I have running all the way across the bottom front of the bag. So I ended up just ripping out the hems on the actual bag sides and sewing a traditional job, it's not what I wanted, I would have liked the French hem option, but I did a tester and doing it on the bottom and the side made a strange one inch step over (may have been related to the hem on the actual pocket/separator) and I was also nervous about my appliqué on front. If I didn't have the appliqué I could have French seamed the bottom and perhaps have just ran a normal stitch up the side. Of course I zig zagged over my initial stitch and in fact as was mentioned since this was such a thick material I had to keep adding on to my zig zags because I'd see some of the edge not caught in my stitch when I turned it inside out! Wondering what is the better way to pocket a two sided quilted bag..... but it's done! I can post pics in two weeks after my big family visit! Thank you all so much for your help and insights!
Post a Comment
<< Home