Tuesday, June 27, 2006

Quilted question 6/27/06

I've been working on two bags. They are made from double sided prequilted fabric. On one of these, to sew the sides together I simply zig zaged the edges first and then stitched them together, first with a straight stitch and then with a another round of zig zags for strengthening. If you've ever worked with quilted fabric then you know when I turned the bag inside out where these were sewn together there is some fraying along the seams.
On the second one I wanted to add a pocket, so I cut out a smaller section to become a separator in between the side panels and stitched some pockets on it. To avoid the fraying I stitched on binding on the separator sides as well as the side panels while it was inside out. The problem is when I turn it right side out, the corners poke up, down on the inside. They don't push all the way out. I know that when we go around corners we need to make snips but I couldn't do this with the hem binding. I thought about cutting off the corner that is poking and sewing where I cut, but this would remove the binding and might be odd. I'm considering ripping the binding off, but then I don't have any better resolution. My only other thought would be to just remove the binding like in the first one and leaving the funny edges. It would be a whole lot of work to undo what I've done now! Any ideas ladies?
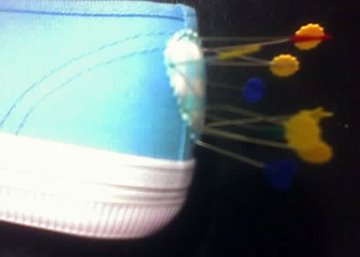
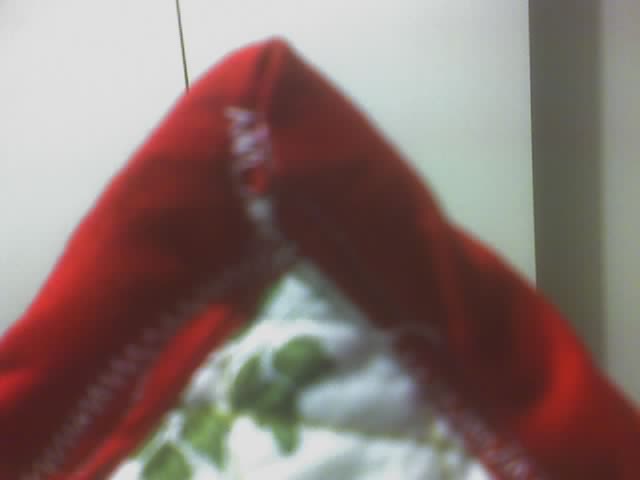
In this picture you can see how wrong it is, this is what needs to turn inside out to become the deep pocket corner.

Friday, June 23, 2006

Don't ya step on my blue suede shoes


I didn't make these shoes I bought them online from Payless shoes for $9.99 (now they are even lower priced at $7.99). They arrived today in their plain blue appearance. I took them back to the studio room and at first I was going to appliqué some teddy bears and bows out of blue and pink fabric but they were so flat, they just didn't have any pop. So I dug around in my box of goodies and found two matching bunnies that I had gotten for a $1.50 each from Diaso (Seattle location). I came up with matching flowers, strawberries and hearts from my magic box as well. The bunnies were iron on, so that was easy. I tried to hand sew on the others but my needle wouldn't go through the thick canvas easily. So I ended up using fabric glue and pinning them down until they dried, which looked rather like voodoo. But I promise there is no magic involved here. The flowers are on the inside of the shoes in alternating colors, same for the strawberries on the outside.I hope the glue holds up under the wear and tear that shoes endure. Guess I'll find out, it will be an experiment!

Wednesday, June 21, 2006

I'm a little tea pot


Last Thursday I had my final sewing class. This PJ was from the pattern that we were instructed to use. I purchased a tea pot print flannel and over sized buttons from Jo-anns for mine. The class was a valuable lesson in following patterns and how to use fusible web for collars, button line ups, and an interesting fold over cuff. I decided to use different colors of embroidery thread for my buttons since they were so large normal thread didn't seem strong enough to hold them. I can't wait for a cooler night so that I can sleep cozy in my new PJs.

Sunday, June 18, 2006

DeeDee


In my house we are fans of Dexter's Laboratory cartoon, not that it has anything to do with my doll but with my animation interest, my husbands comic book interest and our mutual interest in science, it is a fun lighthearted show that we sometimes enjoy. So when I asked what my doll should be named he thought of Dexter's sister DeeDee, I think because of all the pink!
So here we have DeeDee, I made her with a felt white top body, soft rose print flannel arms, cotton stripe legs, felt lips (which actually started out embroidered but per suggested, needed to be bigger and more colorful - the original mouth is buried underneath), the remaining embroidered nose (used to match the old mouth), strawberry button eyes, a permanent ribbon stitched together with an appliqué strawberry, matching ribbon and nylon elastic waistband net slip, gingham heart appliqué (on the chest) with matching elastic waistband skirt and yarn hair! Whew long sentence! I had fun, hope you like it. Click the image to enlarge.

Friday, June 16, 2006

Favorite Friday - Retro player 6/16/06


Every now and then we put on an LP and dance.

Ice cream, you scream, we all scream for ice cream


This is a summery shorts set, it could also be used as sleepwear. The t-shirt was made by Hanes, but I cut out the ice cream fabric (soft flannel), with scalloped edges and used a zig zag stitch to applique on to the front. The shorts were all me and were made the same way I made the piano pants. They are loose and comfy. The bottom photo is a strip of fabric that I stitched together for a matching hair tie. I was so inspired by the outfit that we capped the night off with an ice cream cone! Have a nice weekend.

Wednesday, June 14, 2006

Ring around the pink dots


This was a tester for a button cuff. The rings that I had previously used for my bracelets were difficult to maneuver under the foot of the sewing machine, the rings would have to be far enough away to not get under the foot, but close enough so that the fabric was nice and tight around it, other wise the rings would flop around loosely. I thought a button closure would not only look nice but also resolve some of these problems. I used polka felt (the same as I used on the robot coat), stitched on a 3 dimensional black gingham heart, a pink strawberry patch and a dotted love button. I used pink embroidery for the button and black thread for the button hole to bring the colors together.

Tuesday, June 13, 2006

Self portrait Tuesday 6.13.06

Sunday, June 11, 2006

Piano pants


I can't believe it myself, we have pants. It's not a super tailored pair of pants, it doesn't have pockets, it doesn't have a zipper, or anything fancy, but it is a pair of pants none the less. I laid out a pair of comfy "lounge pants" that I paid 7 dollars for at the corner Rite Aide and used them as a guide to cut my own fabric from. I also turned them inside out to study how they were made. I cut my fabric on the fold so that I didn't have to stitch any seams down the outside of the legs. I selected red thread for an extra pop to go with the black and white fabric. I decided to start with the hem near the feet first, but without stitching them together into a complete circle. I then continued on to the inseam, I used a zig zag for the raw edges and stitched each inner side of the legs in one very long stitch! This also closed up the cuffs. I did this a second time further in, but used a straight stitch for stability. Then I stitched a tube at the waist leaving a two inch opening for the elastic which I pulled through and closed along the tube seam. I had done the inseam of the skirt differently and found that this order works much better. I thought I was done, I took two photos. I walked by the folded up pants, a couple times and thought it needed something else. I thought something red would be good to go with the thread. I found some red velvet ribbon but I was worried about it being washed. I washed the ribbon by itself and it held up so I attached them to the cuff of the pants. My husband wanted to play a song on my leg : )
P.S. There is a new animation over at my animation blog.

Saturday, June 10, 2006

Little sewing pouch


This is a black felt bag with a red felt sewing machine and heart. I used a decorative flower stitch on the sewing machine. The heart on the flap is the heart shape that came out of the sewing machine applique. It's hard to tell in the photos but the end image shows that the flap can be tucked under a 2 inch strip of fabric. 7 inch wide by 6 deep, enough for some sewing supplies.
Hope you are all having a lovely Saturday!

Wednesday, June 07, 2006

Robot coat


I believe I bought this coat two years ago and it was a plain black sports coat, reminiscing of those from the 80's. It hasn't made much of an appearance as it's remained hidden away behind my more interesting coats. I decided to make it interesting. I used one page size of printed felt to make the robot and circle heart from. I sewed them on with my machine, using the zig zag stitch. That's it! Now I'll wear it! Oh, and it matches the skirt! Click image to enlarge.

Monday, June 05, 2006

Polka dot skirt


I made this polka dot skirt today. It's a cotton print with a thin elastic waist. It was really quick and fun to make! And funny looking as I tried to pin a skirt to myself for measurement! The pink embellishment is actually a piece from a set of three that I had (made for scrapbookers). It had glue on the back, I imagine to press onto your pages. I pulled the glue off and stitched it onto the skirt. It looks like I might have embroidered it myself. It did take a lot of moving around with the needle since it has so many little arms and legs on it, but it worked out!

A better indoor shot:

Friday, June 02, 2006

Favorite Friday - Moms afghan


My mother made this crochet afghan to give to me as a wedding gift (married in 2000). The interesting thing about it, aside from it's obvious beauty and the patience required to make it, was that it matched my dress and Victorian theme perfectly, cream and roses. I love the three dimensional rose work, made with love, it's one of my favorite things.

P.S. I've got the Converse animation link up now. Click here. Hope you like it.